def emotion():
    # 3개 파일 불러오기
    origin_text = open("c:\\data\\bomot3.txt", encoding="utf8")
    positive = open("c:\\data\\pos_pol_word.txt", encoding="utf8")
    negative = open("c:\\data\\neg_pol_word.txt", encoding="utf8")

    # 위의 텍스트 파일 3개를 엔터로 구분해서 변수에 담기
    origin = origin_text.read() # orgin_text 를 문자형 변수 orgin 에 담는다.
    pos = positive.read().split('\n') # 긍정단어를 엔터로 구분해서 리스트로 구성
    neg = negative.read().split('\n') # 부정단어를 엔터로 구분해서 리스트로 구성

    # pos 와 neg 리스트에서 결측치를 제거하기
    pos = list ( filter(lambda x : x,pos))
    neg = list ( filter(lambda x : x,neg))

    # 단어 한자리는 삭제하기
    pos1 = list(filter(lambda x : True if len(x) > 1 else False, pos) )
    neg1 = list(filter(lambda x : True if len(x) > 1 else False, neg) )
    print(pos1)


emotion()
긍정단어만 확인한 것
3. 분석하고자하는 텍스트에 나오는 긍정 단어와 부정단어를 저장할 csv파일을 생성
# 분석하고자하는 텍스트에 나오는 긍정 단어와 부정단어를 저장할 csv파일을 생성
f2 = open("c:\\data\\pos_pol_word.csv","w", encoding ="utf8")
f3 = open("c:\\data\\neg_pol_word.csv","w", encoding ="utf8")
# 긍정단어에서 제외시키고 싶은 단어들을 제외학
pos1.remove('ㅎㅎ')
pos1.remove('^^')
pos1.remove('이벤트')
pos1.remove('어진')
# 원본 데이터에서 긍정단어가 얼마나 포함되었는지 확인하고 내리는 코드
for i in pos1:
if i in origin:
f2.write( i + ',' + str(origin.count(i) ) + '\n')
f2.close()
emotion()
4. 데이터 프레임 형태로 출력하기
    import pandas  as  pd

    pd.set_option('display.max_rows', None) # 결과 출력시 중간 생략하지 않고 다 출력

    origin_df = pd.read_csv("c:\\data\\origin_pos.csv", header=None)
    origin_df.columns=['긍정word', '긍정cnt'] # 컬럼명 생성
    origin_df['긍정순위']=origin_df['긍정cnt'].rank(method='dense',ascending=False).astype(int)
    a_pos = origin_df[:].sort_values(by=['긍정순위']).head(20) # 상위 20개만 출력

    return  a_pos
5. 썸트랜드 사이트 처럼 긍정, 부정 단어가 순위가 같이 나오게 emotion 함수를 개선하시오.
def emotion():
# 3개 파일 불러오기
origin_text = open("c:\\data\\bomot3.txt", encoding="utf8")
positive = open("c:\\data\\pos_pol_word.txt", encoding="utf8")
negative = open("c:\\data\\neg_pol_word.txt", encoding="utf8")
# 위의 텍스트 파일 3개를 엔터로 구분해서 변수에 담기
origin = origin_text.read() # orgin_text 를 문자형 변수 orgin 에 담는다.
pos = positive.read().split('\n') # 긍정단어를 엔터로 구분해서 리스트로 구성
neg = negative.read().split('\n') # 부정단어를 엔터로 구분해서 리스트로 구성
# pos 와 neg 리스트에서 결측치를 제거하기
pos = list ( filter(lambda x : x,pos))
neg = list ( filter(lambda x : x,neg))
# 단어 한자리는 삭제하기
pos1 = list(filter(lambda x : True if len(x) > 1 else False, pos) )
neg1 = list(filter(lambda x : True if len(x) > 1 else False, neg) )
# 분석하고자하는 텍스트에 나오는 긍정 단어와 부정단어를 저장할 csv파일을 생성
f2 = open("c:\\data\\pos_pol_word.csv","w", encoding ="utf8")
f3 = open("c:\\data\\neg_pol_word.csv","w", encoding ="utf8")
# 긍정단어에서 제외시키고 싶은 단어들을 제외하기
pos1.remove('ㅎㅎ')
pos1.remove('^^')
pos1.remove('이벤트')
pos1.remove('어진')
# 부정단어에서 제외시키고 싶은 단어들을 제외하기
neg1.remove('ㅜ.ㅜ ')
neg1.remove('ㅜ_ㅜ')
neg1.remove('ㅜㅜ ')
neg1.remove('ㅜㅡ')
neg1.remove('ㅠ_ㅠ')
neg1.remove('ㅠㅠ ')
neg1.remove('ㅡㅡ')
# 원본 데이터에서 긍정단어가 얼마나 포함되었는지 확인하고 내리는 코드
for i in pos1:
if i in origin:
f2.write( i + ',' + str(origin.count(i) ) + '\n')
f2.close()
# 원본 데이터에서 부정단어가 얼마나 포함되었는지 확인하고 내리는 코드
for i in neg1:
if i in origin:
f3.write( i + ',' + str(origin.count(i) ) + '\n')
f3.close()
# 데이터 프레임 형태로 출력하기
import pandas as pd
pd.set_option('display.max_rows', None) # 결과 출력시 중간 생략하지 않고 다 출력
# 긍정단어 데이터프레임
pos_df = pd.read_csv("c:\\data\\origin_pos.csv", header=None)
pos_df.columns = ['긍정word', '긍정cnt'] # 컬럼명 생성
pos_df['긍정순위'] = pos_df['긍정cnt'].rank(method='dense', ascending=False).astype(int)
a_pos = pos_df.sort_values(by=['긍정순위']).head(20) # 상위 20개만 출력
# 부정단어 데이터프레임
neg_df = pd.read_csv("c:\\data\\origin_neg.csv", header=None)
neg_df.columns = ['부정word', '부정cnt'] # 컬럼명 생성
neg_df['부정순위'] = neg_df['부정cnt'].rank(method='dense', ascending=False).astype(int)
a_neg = neg_df.sort_values(by=['부정순위']).head(20) # 상위 20개만 출력
# 두 데이터프레임을 결합
a_pos = a_pos.reset_index(drop=True)
a_neg = a_neg.reset_index(drop=True)
f_df = pd.concat([a_pos, a_neg], axis=1)
return f_df
emotion()
■ 워드클라우드 생성
1. 위의 코드를 csv 파일로 만들고 워드 클라우드 만들기
def emotion():
# 3개 파일 불러오기
origin_text = open("c:\\data\\bomot3.txt", encoding="utf8")
positive = open("c:\\data\\pos_pol_word.txt", encoding="utf8")
negative = open("c:\\data\\neg_pol_word.txt", encoding="utf8")
# 위의 텍스트 파일 3개를 엔터로 구분해서 변수에 담기
origin = origin_text.read() # orgin_text 를 문자형 변수 orgin 에 담는다.
pos = positive.read().split('\n') # 긍정단어를 엔터로 구분해서 리스트로 구성
neg = negative.read().split('\n') # 부정단어를 엔터로 구분해서 리스트로 구성
# pos 와 neg 리스트에서 결측치를 제거하기
pos = list ( filter(lambda x : x,pos))
neg = list ( filter(lambda x : x,neg))
# 단어 한자리는 삭제하기
pos1 = list(filter(lambda x : True if len(x) > 1 else False, pos) )
neg1 = list(filter(lambda x : True if len(x) > 1 else False, neg) )
# 분석하고자하는 텍스트에 나오는 긍정 단어와 부정단어를 저장할 csv파일을 생성
f2 = open("c:\\data\\pos_pol_word.csv","w", encoding ="utf8")
f3 = open("c:\\data\\neg_pol_word.csv","w", encoding ="utf8")
# 긍정단어에서 제외시키고 싶은 단어들을 제외하기
pos1.remove('ㅎㅎ')
pos1.remove('^^')
pos1.remove('이벤트')
pos1.remove('어진')
# 부정단어에서 제외시키고 싶은 단어들을 제외하기
neg1.remove('ㅜ.ㅜ ')
neg1.remove('ㅜ_ㅜ')
neg1.remove('ㅜㅜ ')
neg1.remove('ㅜㅡ')
neg1.remove('ㅠ_ㅠ')
neg1.remove('ㅠㅠ ')
neg1.remove('ㅡㅡ')
# 원본 데이터에서 긍정단어가 얼마나 포함되었는지 확인하고 내리는 코드
for i in pos1:
if i in origin:
f2.write( i + ',' + str(origin.count(i) ) + '\n')
f2.close()
# 원본 데이터에서 부정단어가 얼마나 포함되었는지 확인하고 내리는 코드
for i in neg1:
if i in origin:
f3.write( i + ',' + str(origin.count(i) ) + '\n')
f3.close()
# 데이터 프레임 형태로 출력하기
import pandas as pd
pd.set_option('display.max_rows', None) # 결과 출력시 중간 생략하지 않고 다 출력
# 긍정단어 데이터프레임
pos_df = pd.read_csv("c:\\data\\origin_pos.csv", header=None)
pos_df.columns = ['긍정word', '긍정cnt'] # 컬럼명 생성
pos_df['긍정순위'] = pos_df['긍정cnt'].rank(method='dense', ascending=False).astype(int)
a_pos = pos_df.sort_values(by=['긍정순위']).head(20) # 상위 20개만 출력
# 부정단어 데이터프레임
neg_df = pd.read_csv("c:\\data\\origin_neg.csv", header=None)
neg_df.columns = ['부정word', '부정cnt'] # 컬럼명 생성
neg_df['부정순위'] = neg_df['부정cnt'].rank(method='dense', ascending=False).astype(int)
a_neg = neg_df.sort_values(by=['부정순위']).head(20) # 상위 20개만 출력
# a_pos 와 a_neg 데이터 프레임을 각각 csv파일로 저장하기
a_pos.to_csv("c:\\data\\a_pos.csv", index = False, encoding="utf8" )
a_neg.to_csv("c:\\data\\a_neg.csv", index = False, encoding="utf8" )
# 두 데이터프레임을 결합
a_pos = a_pos.reset_index(drop=True)
a_neg = a_neg.reset_index(drop=True)
f_df = pd.concat([a_pos, a_neg], axis=1)
return f_df
emotion()
2. 긍정 부정 단어.csv 파일로 워드클라우드 그리기
## 위의 csv 파일로 워드 클라우드 그리기
# 필요한 모듈을 불러옵니다.
import pandas as pd
from wordcloud import WordCloud
import matplotlib.pyplot as plt
# csv 파일 불러오기
file_path_pos = 'c:\\data\\a_pos.csv' # -> 긍정 단어 파일 불러오기
df_pos= pd.read_csv(file_path_pos)
file_path_neg = 'c:\\data\\a_neg.csv' # -> 부정 단어 파일 불러오기
df_neg = pd.read_csv(file_path_neg)
# 감정 단어와 cnt를 사전으로 변환
word_freq_pos = dict(zip(df_pos['긍정word'], df_pos['긍정cnt']))
word_freq_neg = dict(zip(df_neg['부정word'], df_neg['부정cnt']))
# 상위 7개 단어를 추출
top_pos_words = df_pos.nlargest(7, '긍정cnt')['긍정word'].tolist()
top_neg_words = df_neg.nlargest(7, '부정cnt')['부정word'].tolist()
# 주요 단어 설정
highlight_words = set(top_pos_words + top_neg_words)
# 색상 설정 함수
def color_func_pos(word, font_size, position, orientation, random_state = None, **kwargs):
return 'blue' if word in highlight_words else 'black'
def color_func_neg(word, font_size, position, orientation, random_state = None, **kwargs):
return 'red' if word in highlight_words else 'black'
# 긍정 워드 클라우드 생성
wordcloud_pos = WordCloud(font_path = 'c:\\windows\\Fonts\\malgun.ttf',
width = 800,
height = 400,
background_color = 'white',
color_func = color_func_pos).generate_from_frequencies(word_freq_pos)
# 부정 워드 클라우드 생성
wordcloud_neg = WordCloud(font_path = 'c:\\windows\\Fonts\\malgun.ttf',
width = 800,
height = 400,
background_color = 'white',
color_func = color_func_neg).generate_from_frequencies(word_freq_neg)
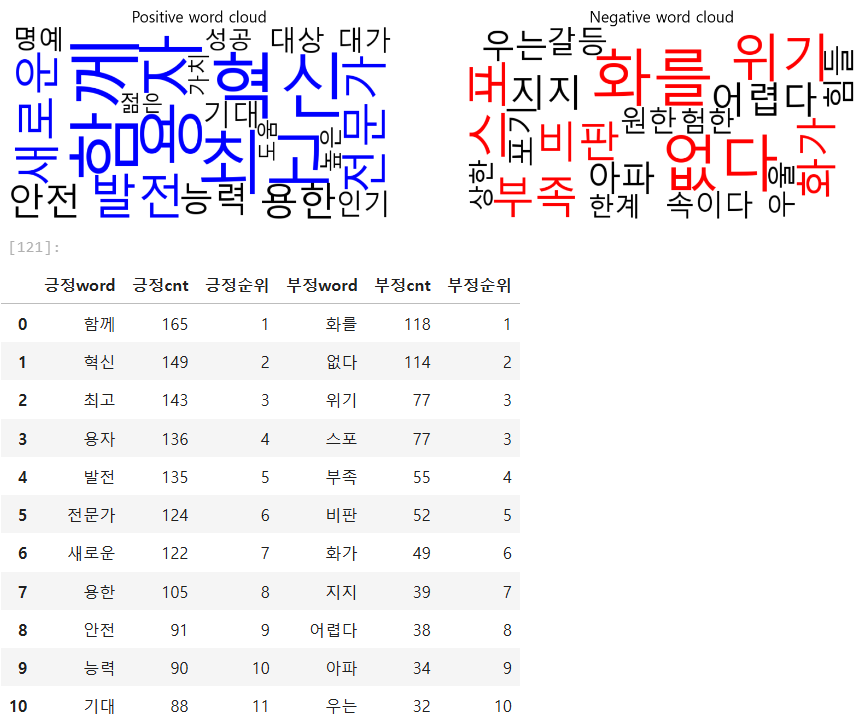
# 두 워드 클라우드를 나란히 시각화
fig, axes = plt.subplots(1, 2, figsize = (20, 10)) # 1행 2열
# 첫번째 워드 클라우드(긍정)
axes[0].imshow(wordcloud_pos, interpolation = 'bilinear')
axes[0].set_title('Positive word cloud', fontsize = 20)
axes[0].axis('off')
# 두번째 워드 클라우드(부정)
axes[1].imshow(wordcloud_neg, interpolation = 'bilinear')
axes[1].set_title('Negative word cloud', fontsize = 20)
axes[1].axis('off')
# 워드 클라우드 출력
plt.show()
3. 위의 코드를 함수로 만드시오.
def pos_neg_wordcloud():

    ## 위의 csv 파일로 워드 클라우드 그리기

    # 필요한 모듈을 불러옵니다.

    import pandas as pd
    from wordcloud import WordCloud
    import matplotlib.pyplot as plt

    # csv 파일 불러오기

    file_path_pos = 'c:\\data\\a_pos.csv' # -> 긍정 단어 파일 불러오기
    df_pos= pd.read_csv(file_path_pos)

    file_path_neg = 'c:\\data\\a_neg.csv' # -> 부정 단어 파일 불러오기
    df_neg = pd.read_csv(file_path_neg)

    # 감정 단어와 cnt를 사전으로 변환
    word_freq_pos = dict(zip(df_pos['긍정word'], df_pos['긍정cnt']))
    word_freq_neg = dict(zip(df_neg['부정word'], df_neg['부정cnt']))

    # 상위 7개 단어를 추출
    top_pos_words = df_pos.nlargest(7, '긍정cnt')['긍정word'].tolist()
    top_neg_words = df_neg.nlargest(7, '부정cnt')['부정word'].tolist()

    # 주요 단어 설정
    highlight_words = set(top_pos_words + top_neg_words)

    # 색상 설정 함수
    def color_func_pos(word, font_size, position, orientation, random_state = None, **kwargs):
        return 'blue' if word in highlight_words else 'black'

    def color_func_neg(word, font_size, position, orientation, random_state = None, **kwargs):
        return 'red' if word in highlight_words else 'black'


    # 긍정 워드 클라우드 생성
    wordcloud_pos = WordCloud(font_path = 'c:\\windows\\Fonts\\malgun.ttf',
                              width = 800,
                              height = 400,
                              background_color = 'white',
                              color_func = color_func_pos).generate_from_frequencies(word_freq_pos)


    # 부정 워드 클라우드 생성
    wordcloud_neg = WordCloud(font_path = 'c:\\windows\\Fonts\\malgun.ttf',
                              width = 800,
                              height = 400,
                              background_color = 'white',
                              color_func = color_func_neg).generate_from_frequencies(word_freq_neg)


    # 두 워드 클라우드를 나란히 시각화
    fig, axes = plt.subplots(1, 2, figsize = (20, 10)) # 1행 2열

    # 첫번째 워드 클라우드(긍정)
    axes[0].imshow(wordcloud_pos, interpolation = 'bilinear')
    axes[0].set_title('Positive word cloud', fontsize = 20)
    axes[0].axis('off')

    # 두번째 워드 클라우드(부정)
    axes[1].imshow(wordcloud_neg, interpolation = 'bilinear')
    axes[1].set_title('Negative word cloud', fontsize = 20)
    axes[1].axis('off')

    # 워드 클라우드 출력
    plt.show()
# 함수 실행
pos_neg_wordcloud()
emotion()
★ 다른 txt 파일 활용 할 수 있는 최종 코드
● 첫번째 함수
def emotion(location):
    #1.텍스트 파일 3개를 불러옵니다.
    origin_text = open( location , encoding="utf8")
    positive = open("c:\\data\\pos_pol_word.txt", encoding="utf8")
    negative = open("c:\\data\\neg_pol_word.txt", encoding="utf8")

    #2.위의 텍스트 파일 3개를 엔터로 구분해서 변수에 담습니다.
    origin = origin_text.read() # orgin_text 를 문자형 변수 orgin 에 담는다.
    pos = positive.read().split('\n') # 긍정단어를 엔터로 구분해서 리스트로 구성
    neg = negative.read().split('\n') # 부정단어를 엔터로 구분해서 리스트로 구성

    #3. pos 와 neg 리스트에서 결측치를 제거합니다.
    pos = list( filter(lambda x : x, pos) )
    neg = list( filter(lambda x : x, neg) )

    #4. 단어 한자리는 삭제
    pos1 = list(filter( lambda x : True  if len(x) > 1 else False, pos) )
    neg1 = list(filter( lambda x : True  if len(x) > 1 else False, neg) )

    #5.분석하고자하는 텍스트에 나오는 긍정 단어와 부정단어를 저장할 csv 파일을 생성
    f2 = open("c:\\data\\origin_pos.csv", "w", encoding="utf8")
    f3 = open("c:\\data\\origin_neg.csv", "w", encoding="utf8")

    #6. 긍정단어에서 제외시키고 싶은 단어들을 제외 시킵니다.
    pos1.remove('ㅎㅎ')
    pos1.remove('^^')
    pos1.remove('이벤트')
    pos1.remove('어진')

    #7. 원본 데이터에서 긍정단어가 얼마나 포함되었는지 확인하고 내리는 코드
    for i  in  pos1:
        if  i  in origin:
            f2.write( i + ',' + str(origin.count(i) ) + '\n')
    f2.close()

    for i  in  neg1:
        if  i  in origin:
            f3.write( i + ',' + str(origin.count(i) ) + '\n')
    f3.close()


    #8. 위에서 생성한 csv 파일을 판다스 데이터 프레임으로 만들어서 출력하는 코드
    import pandas  as  pd

    pd.set_option('display.max_rows', None) # 결과 출력시 중간 생략하지 않고 다 출력

    origin_df = pd.read_csv("c:\\data\\origin_pos.csv", header=None)
    origin_df.columns=['긍정word', '긍정cnt'] # 컬럼명 생성
    origin_df['긍정순위']=origin_df['긍정cnt'].rank(method='dense',ascending=False).astype(int)

    origin_df2 = pd.read_csv("c:\\data\\origin_neg.csv", header=None)
    origin_df2.columns=['부정word', '부정cnt'] # 컬럼명 생성
    origin_df2['부정순위']=origin_df2['부정cnt'].rank(method='dense',ascending=False).astype(int)

    a_pos = origin_df[:].sort_values(by=['긍정순위']).head(20) # 상위 20개만 출력
    a_neg = origin_df2[:].sort_values(by=['부정순위']).head(20)

    # a_pos 와 a_neg 데이터 프레임을 각각 csv 파일로 저장하기
    a_pos.to_csv("c:\\data\\a_pos.csv", index=False, encoding='utf-8-sig')
    a_neg.to_csv("c:\\data\\a_neg.csv",  index=False, encoding='utf-8-sig')

    a_pos.reset_index(drop=True, inplace=True)   # a_pos 데이터 프레임의 인덱스 없앰
    a_neg.reset_index(drop=True, inplace=True)  # a_nag 데이터 프레임의 인덱스 없앰
    result_df = pd.concat([a_pos,a_neg], axis=1)   # 인덱스 없는 상태에서 그냥 그대로
                                                # 양옆으로 붙인다.
    pos_neg_wordcloud()
    return result_df.style.hide(axis ='index')
● 두번째 함수
def pos_neg_wordcloud():
    # 위의 csv 파일로 워드 클라우드 그리기

    #1. 필요한 모듈을 불러옵니다.
    import pandas  as  pd
    from wordcloud import WordCloud
    import  matplotlib.pyplot  as  plt

    #2.csv 파일 불러오기
    # 2.1. 긍정단어 불러오기
    file_path_pos = "c:\\data\\a_pos.csv"
    df_pos = pd.read_csv(file_path_pos)

    # 2.2. 부정단어 불러오기
    file_path_neg = "c:\\data\\a_neg.csv"
    df_neg = pd.read_csv(file_path_neg)

    #3. 긍정단어와 부정단어의 빈도수를 사전으로 변환
    word_freq_pos = dict( zip(df_pos['긍정word'], df_pos['긍정cnt']))
    word_freq_neg = dict( zip(df_neg['부정word'], df_neg['부정cnt']))

    # 상위 7개의 단어를 추출
    top_pos_words=df_pos.nlargest(7,'긍정cnt')['긍정word'].tolist()
    top_neg_words=df_neg.nlargest(7,'부정cnt')['부정word'].tolist()

    # 주요 단어 설정
    highlight_words = set(top_pos_words + top_neg_words)

    #긍정 색상 설정 함수
    def  color_func_pos(word, font_size, position, orientation, random_state=None,**kwargs):
        return  'blue' if  word  in highlight_words  else 'black'

    #부정 색상 설정 함수
    def  color_func_neg(word, font_size, position, orientation, random_state=None,**kwargs):
        return  'red' if  word  in highlight_words  else 'black'

    #4. 긍정 워드 클라우드 생성
    wordcloud_pos = WordCloud(
        font_path ='c:\\windows\\Fonts\\malgun.ttf',
        width=800,
        height=400,
        background_color='white',
        color_func=color_func_pos
    ).generate_from_frequencies(word_freq_pos)


    #4. 부정 워드 클라우드 생성
    wordcloud_neg = WordCloud(
        font_path ='c:\\windows\\Fonts\\malgun.ttf',
        width=800,
        height=400,
        background_color='white',
        color_func=color_func_neg
    ).generate_from_frequencies(word_freq_neg)

    #5.두 워드 클라우드를 나란히 시각화
    fig, axes = plt.subplots(1, 2, figsize=(20, 10) )  # 1행 2열

    # 첫번째 워드 클라우드(긍정)
    axes[0].imshow(wordcloud_pos, interpolation='bilinear')
    axes[0].set_title('Positive word cloud', fontsize=20)
    axes[0].axis('off')

    # 두번째 워드 클라우드(부정)
    axes[1].imshow(wordcloud_neg, interpolation='bilinear')
    axes[1].set_title('Negative word cloud', fontsize=20)
    axes[1].axis('off')

    plt.show()